Once I finished weight painting I moved onto the animation processes of my sequences.
The 3 sequences that i decided to make was a simple walk cycle, an idle animation and a more complex one where the character picks up a gun and aims it.
WALK CYCLE
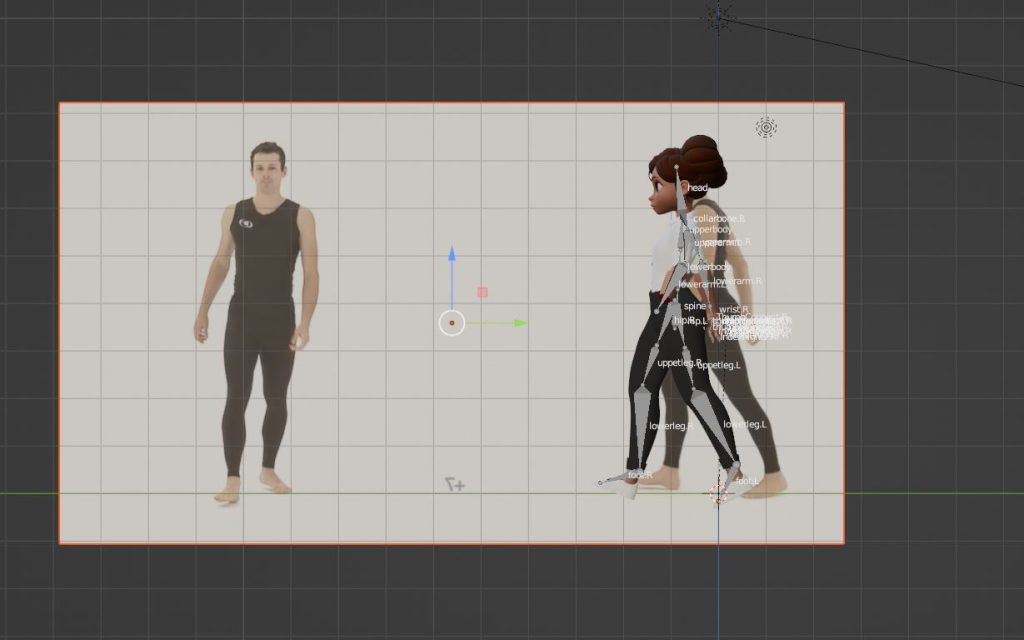
I began with the walk cycle. For this sequence I started by finding a suitable reference video which could be used for guidance when I was animating the character. Once I found one the reference video I downloaded it and imported it as an image plane into blender so that I could see the video play back while I was animating, it also had a frame counter inside the video itself which was very helpful with keeping up on the movements correctly.

Once I got to around 35 frames I removed the video from the viewport to test the animation itself and I thought it was good, i then changed a few things with the animation to clean it up and then copied the animation a few times to make it a cycle and not just a couple of steps.
IDLE ANIMATION
For the idle animation I decided to improve upon the previous animation by making sure everything was a lot smoother
To do this I set the character up in a standard T-pose and then I began by putting them into a relaxed pose to test how it will look before i begin animating it. I did this to see if there was any issues with the weight painting, and I couldn’t see any so i proceeded with the animation.
Firstly I began by creating the breathing movement of the character, I did this so that the character would sway as all people do when we are stood still. I then started to animate the arms so that they could come together at the beginning.
Towards the end I added an arc which is one of the principles of animation, I did this when the character was moving their left arm up and down while observing it at the same time, the arc is that the arm does not move in the same direction each time, it moves up and down with a slight side to side movement when the character is breathing, this is made like this to show that the character is not on rails and has as much realism as I can give to the character with my limited animation skills.
GUN ANIMATION
Finally for my third animation I used a model that I have previously created, this being a rifle. This relates back to my original character as they were a soldier so i decided this was the best idea I could come up with that can incorporate that character’s design into this new character.
I started off with a small walking sequence, this was to get to a block which had the gun sat on top of it. Once the character got to the block I slowed the movement down and brought them to a stop and put the legs into a rest pose.
I then moved the lower torso bone down to imitate a person bending down and then used another principle of animation which is staging to bring the camera behind the characters head to get the rifle into a better shot for the viewer to see. I then animated the arms to pick up the gun.
After this i had some issues with how the character would hold the gun so i decided to go with a new approach, i rendered out the first part of the animation, then i went back into it and created the second part which had the character hold a gun.
I did this by adding a “child of” constraint to the rifle, targeted the skeleton of the character, and then connected the rifle to the right wrist bone so that whenever I move the arm, wrist or elbow the gun will move accordingly and would not move by itself without an outside influence.
Once I finished dealing with this problem i then moved onto making the character aim the rifle and had some anticipation when the character started turning their torso before the gun itself was raised.
Reference: Youtube.com (Athletic Male Standard Walk. Animation Reference Body Mechanics), 2010, https://www.youtube.com/watch?v=vq9A5FD8G5w Accessed Online [15/04/22]