To begin the design process I began by researching the types of trains which were in 1870s America. I did this by going on google images and searching up different types of steam trains that were in America during the time period and then I took inspiration.
Once I completed this research I began modelling the train itself, I did this by creating multiple rough blackouts of the tubes and the main body and cab of the locomotive. After i did this i went into more detail for the intricate parts of the model such as indents for different parts of the main body, and also the windows for the cab. Then I made the wheels and mechanisms around the wheels.
Finally i textured all of the train inside of substance painter and sent over the textures to the game so that they are visible on the train when playing.
Train inside of substance painter after texturing.
I did this process for all of the models that I created as this was the simplest way to create all of the models that I wanted to make, plus it was also easier to make them in groups then texture them in groups too.
After I created my models i used my train model to create the pre vis animation, i did this by creating rough models for the environment, train carriages, bridge and train tracks, i animated the train going down the canyon path underneath the bridge where a character jumped off and landed inside the last carriage. I textured and rendered this and gave it to the team member who would create the final cutscene for the game intro.
Overall the team worked very well, we were always communicating with each other via discord where we had a group to discuss the process of the project and also share images of what we had done at certain points in time.
The 3d modelers in the team worked well together as we were always communicating with each other about what models we were creating, in addition to this we also helped each other out when we encountered issues. For example when I had issues texturing my sofa, one of the other modelers helped fixing all of the UVs so that it was able to be textured without any issues.
There was also good communication to the team leader as once we finished a model he was able to add the models into the project to see how they were in the game, this was the same with the person who was creating the functionality of the game. For example when I finished my reworked revolver i gave him the files for it and he added it into the game and replaced the template revolver that he created with the one that I made.
One problem we did have with the team was the 2d artist who was supposed to make the main menu art as well as the logo for the game, however due to time constraints one of the other team members had to create that logo. The 2d artist did however, manage to create some very useful concept art at the start of the project which helped quite a lot when creating initial assets.
In general i think the teamwork and leadership went well when making the project and didn’t encounter too many issues.
When we began the project, we initially planned for a game that was to be made by only 3 people, however after 2 weeks we merged 2 teams together to create a group of 6.
We also initially planned on only creating a game that was quite short in length which would not have too many aspects to it, however after we merged the 2 teams into one we were able to add a lot more ideas which raised the overall quality of the project as a whole.
Once we finished with the initial ideas we decided that we could create many levels that the player will be able to travel through, roughly 7 levels, including many varying factors to them, like a floating level, a normal train level, a backwards train level etc.
We also had a small schedule which helped us when we first started creating the project as it helped us stay on time and helped us know what to do.
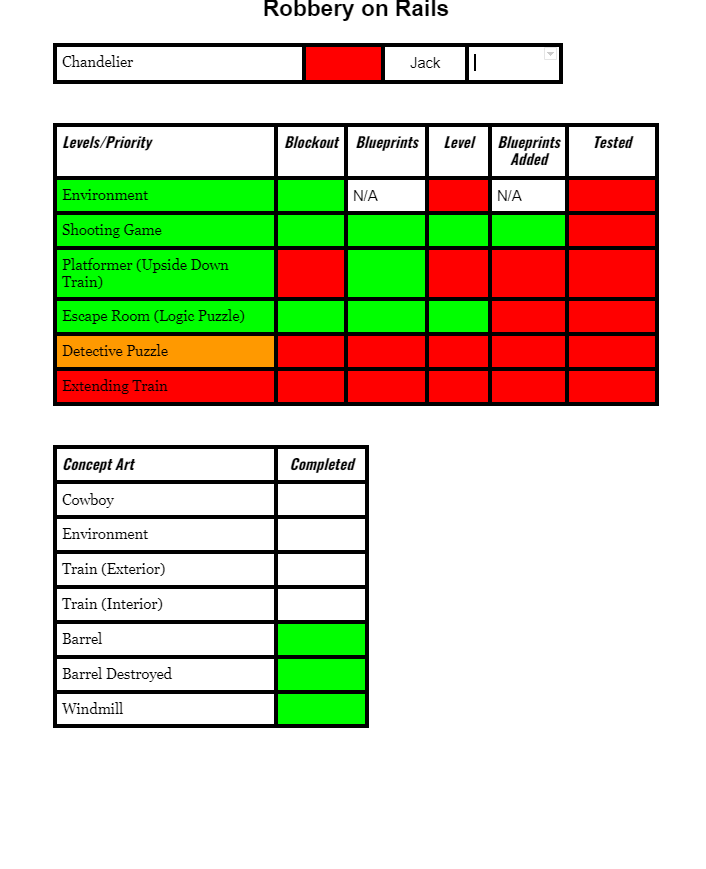
Finally we made a google docs page so that we could write down all the assets that we needed to create and all the levels that we needed to create too, we have boxes to say if they’re done and also what date they were done, this makes planning what to do next a lot easeir because it tells each modeler what asset they should make next and what assets have already been made by themselves or by others.
Google Doc Page for Assets
Here is the model sheet with colour coordinated this was very helpful because it gave us a sheet of models that needed to be created and we could choose which ever models we wanted and put our names next to them.
Google Doc Page On Levels/ Concept art
Here is the level priority and concept art tables, these helped us organize the levels and concept art pieces that needed to be created.
For the group project, I was one of the 3d modellers. My task was to create some 3d models for the game, these being some background objects, the train locomotive, a sofa, revolver and finally a bridge.
My main strengths in this project was my commitment to making good quality models so that the models that other group members have made don’t look out of place, or so that they don’t have different styles. Another strength was being able to quickly make the models so that the group can test them within the game itself, this helped lots as if they wanted to see what something was like then I could make the model quickly
For all of my work on this project I used the free open source 3d creation software known as blender, I used this as I’ve used it for a few years now and I would say that I’m confident in using the software.
In addition to my 3d modelling work for the group, I also created a pre-vis animation that would be used as direct inspiration to the cutscene which will play at the start of the game, I did this to help the team member who was creating the cutscene get a sense of what he should create before he creates it.
I encountered some issues when making my models, for example my revolver file becoming corrupted, but once i recovered an older version I managed to remake the back half of the gun and improved upon the first version.
Another problem I encountered was the train cab breaking and not showing faces in the correct arrangement, I had to change the cab design multiple times until i got to a point where there wasn’t any clipping and everything looked normal.
Once I finished weight painting I moved onto the animation processes of my sequences.
The 3 sequences that i decided to make was a simple walk cycle, an idle animation and a more complex one where the character picks up a gun and aims it.
WALK CYCLE
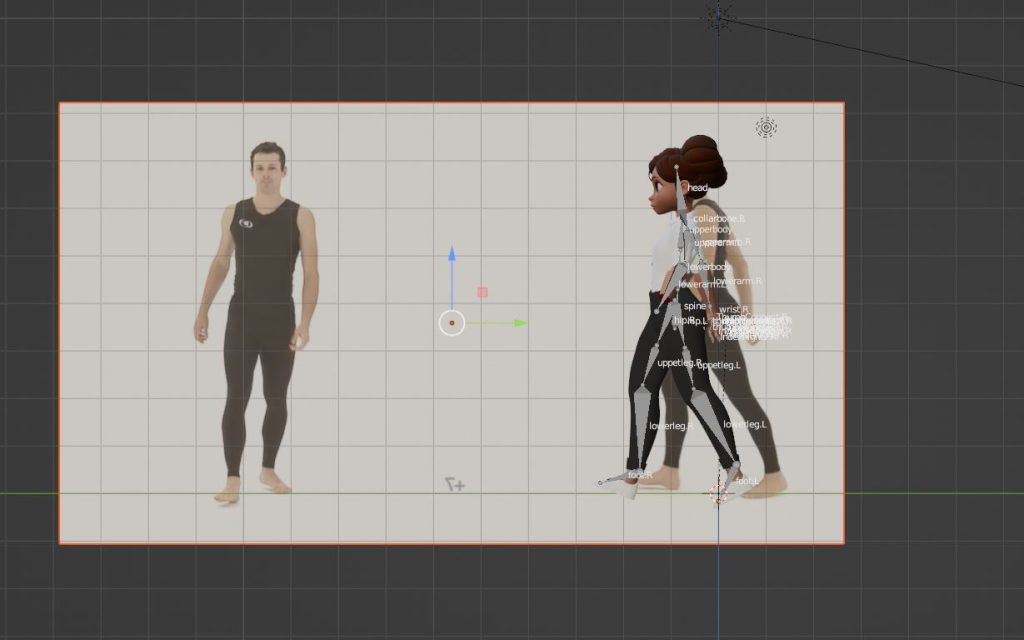
I began with the walk cycle. For this sequence I started by finding a suitable reference video which could be used for guidance when I was animating the character. Once I found one the reference video I downloaded it and imported it as an image plane into blender so that I could see the video play back while I was animating, it also had a frame counter inside the video itself which was very helpful with keeping up on the movements correctly.
Once I got to around 35 frames I removed the video from the viewport to test the animation itself and I thought it was good, i then changed a few things with the animation to clean it up and then copied the animation a few times to make it a cycle and not just a couple of steps.
IDLE ANIMATION
For the idle animation I decided to improve upon the previous animation by making sure everything was a lot smoother
To do this I set the character up in a standard T-pose and then I began by putting them into a relaxed pose to test how it will look before i begin animating it. I did this to see if there was any issues with the weight painting, and I couldn’t see any so i proceeded with the animation.
Firstly I began by creating the breathing movement of the character, I did this so that the character would sway as all people do when we are stood still. I then started to animate the arms so that they could come together at the beginning.
Towards the end I added an arc which is one of the principles of animation, I did this when the character was moving their left arm up and down while observing it at the same time, the arc is that the arm does not move in the same direction each time, it moves up and down with a slight side to side movement when the character is breathing, this is made like this to show that the character is not on rails and has as much realism as I can give to the character with my limited animation skills.
GUN ANIMATION
Finally for my third animation I used a model that I have previously created, this being a rifle. This relates back to my original character as they were a soldier so i decided this was the best idea I could come up with that can incorporate that character’s design into this new character.
I started off with a small walking sequence, this was to get to a block which had the gun sat on top of it. Once the character got to the block I slowed the movement down and brought them to a stop and put the legs into a rest pose.
I then moved the lower torso bone down to imitate a person bending down and then used another principle of animation which is staging to bring the camera behind the characters head to get the rifle into a better shot for the viewer to see. I then animated the arms to pick up the gun.
After this i had some issues with how the character would hold the gun so i decided to go with a new approach, i rendered out the first part of the animation, then i went back into it and created the second part which had the character hold a gun.
I did this by adding a “child of” constraint to the rifle, targeted the skeleton of the character, and then connected the rifle to the right wrist bone so that whenever I move the arm, wrist or elbow the gun will move accordingly and would not move by itself without an outside influence.
Once I finished dealing with this problem i then moved onto making the character aim the rifle and had some anticipation when the character started turning their torso before the gun itself was raised.
Once i completed the rigging process i moved onto weight painting.
Weight painting, for me, was quite difficult and I tried a couple ways of weight painting before i fully understood it. The first way was using the weight paint brush, this worked in some areas, however in other areas it didn’t really work well due to multiple layers of the character model, i then began to experiment with vertex weight painting which uses vertices and faces to weight paint. I found the second option so much more helpful as well as easier compared to using the weight paint brush so I decided to stay with this option.
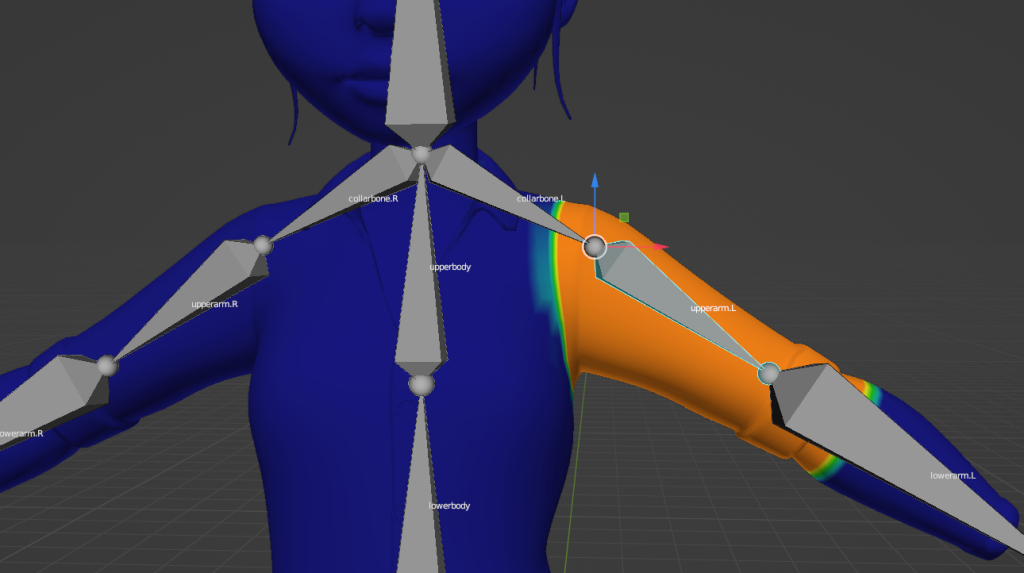
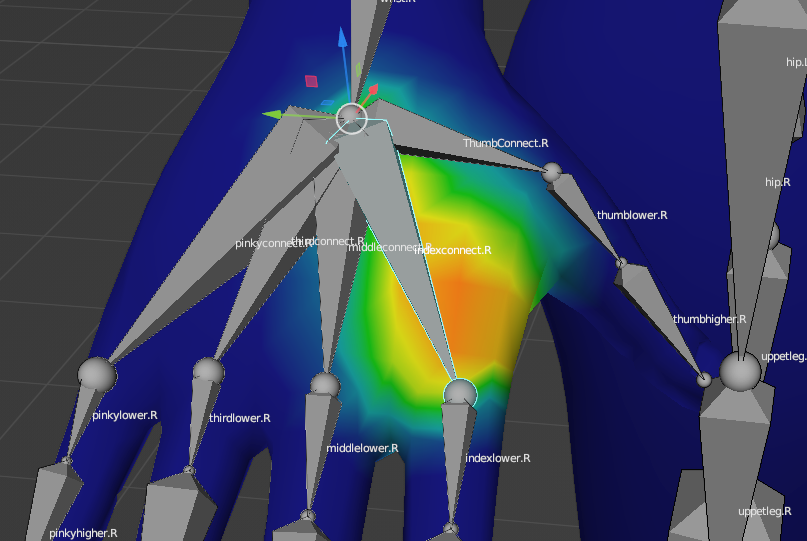
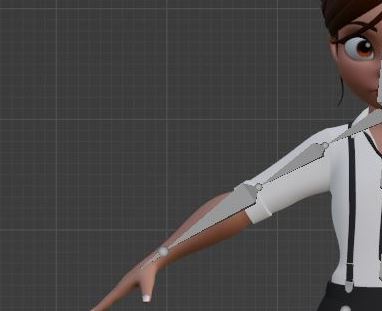
I first began weight painting the arms, I did this as they were the easiest parts to weight paint, I did this by pressing shift + alt to select the faces all around the arm and continued doing this until I got to the boundaries of the upper arm bone. Below is an image of the bone and the weight painting around it.
I did this same tactic with both arms and all the bones in them.
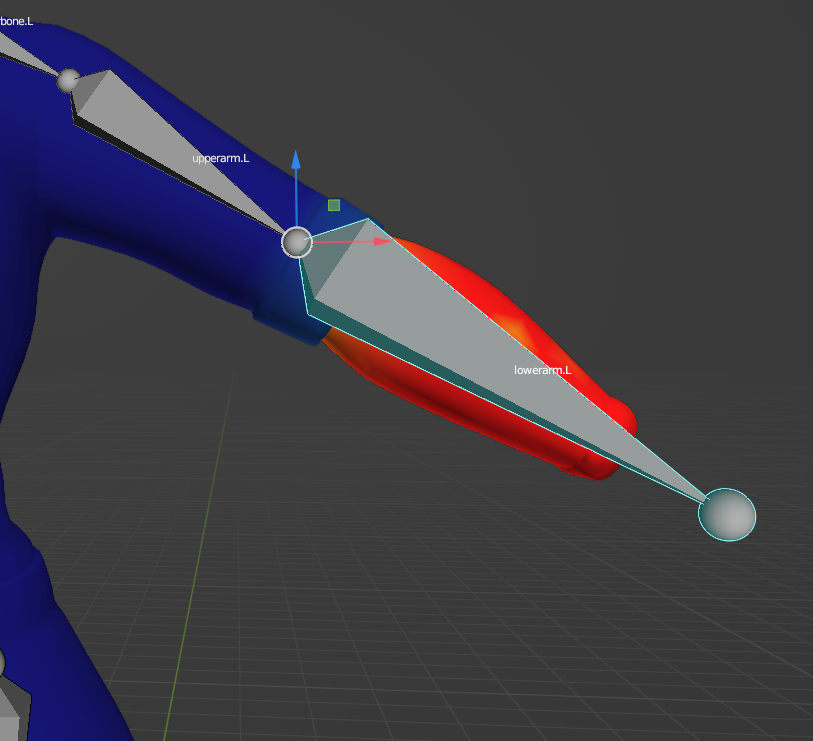
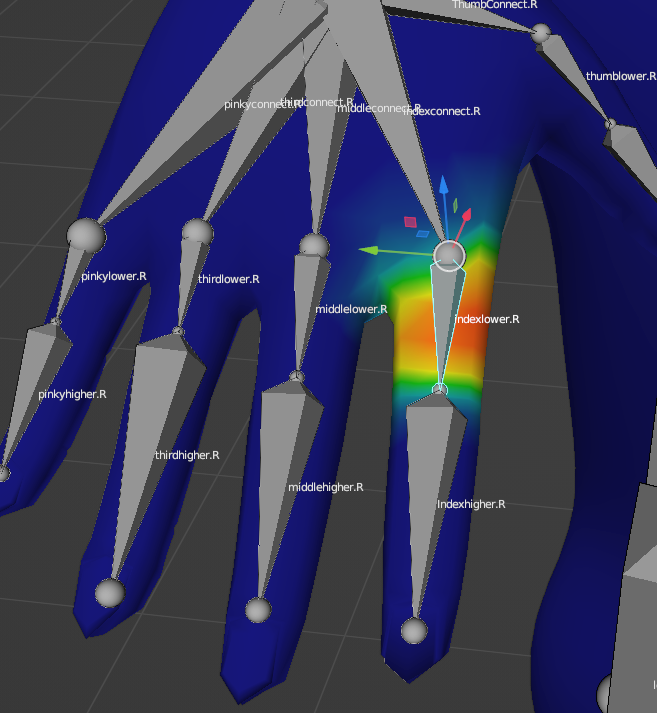
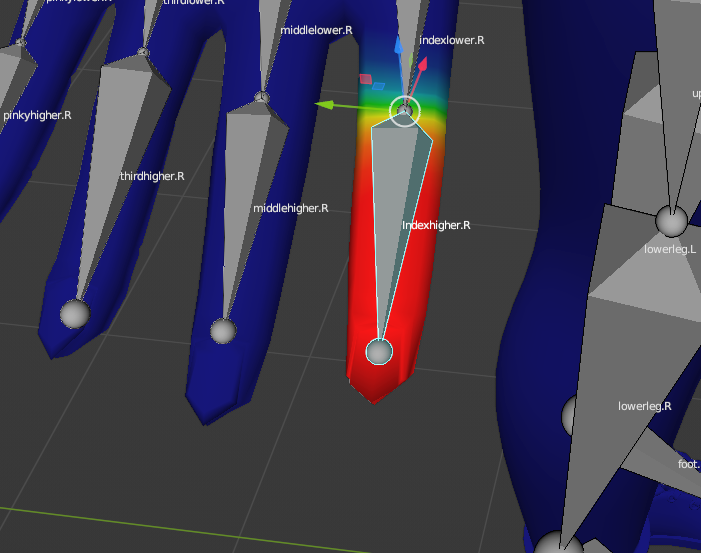
For the lower left arm I entered x-ray mode so see through the mesh and select all faces below the upper arm bone, however I did intrude on the upper arm bone area slightly to give the lower arm more realistic movement when i wanted to bend the elbow.
I did similar to this on the lower left arm, just didn’t include the hands because this arm has a hand contrary to the left hand.
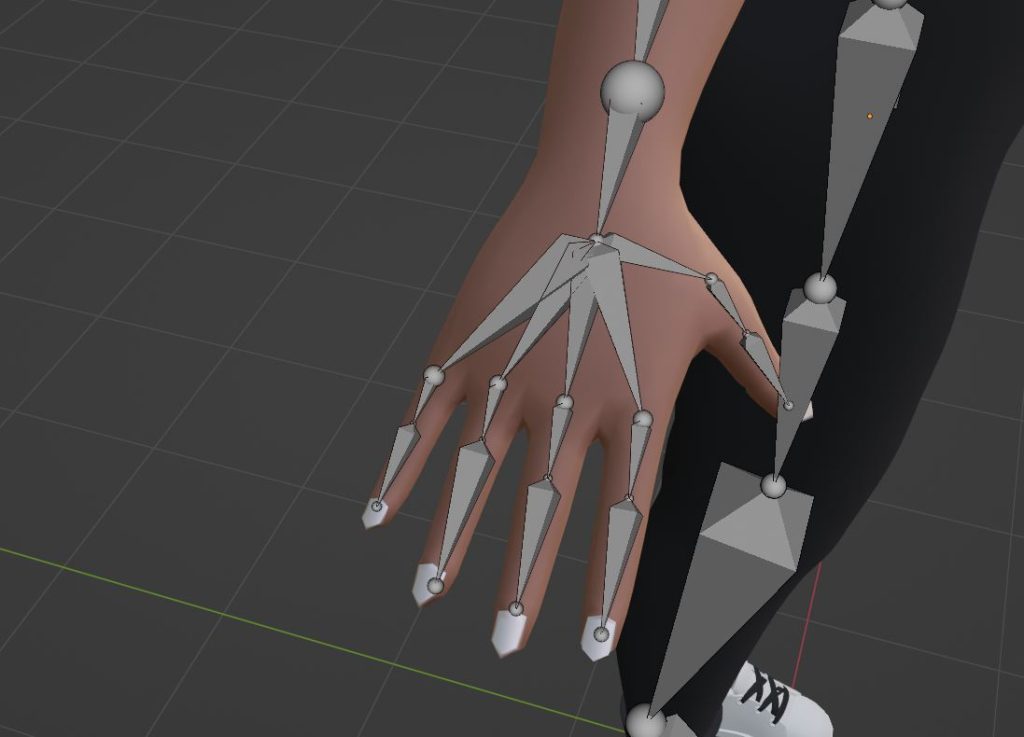
The hands were quite simple to weight paint as I only really needed to attach a small amount of faces to each of the bones.
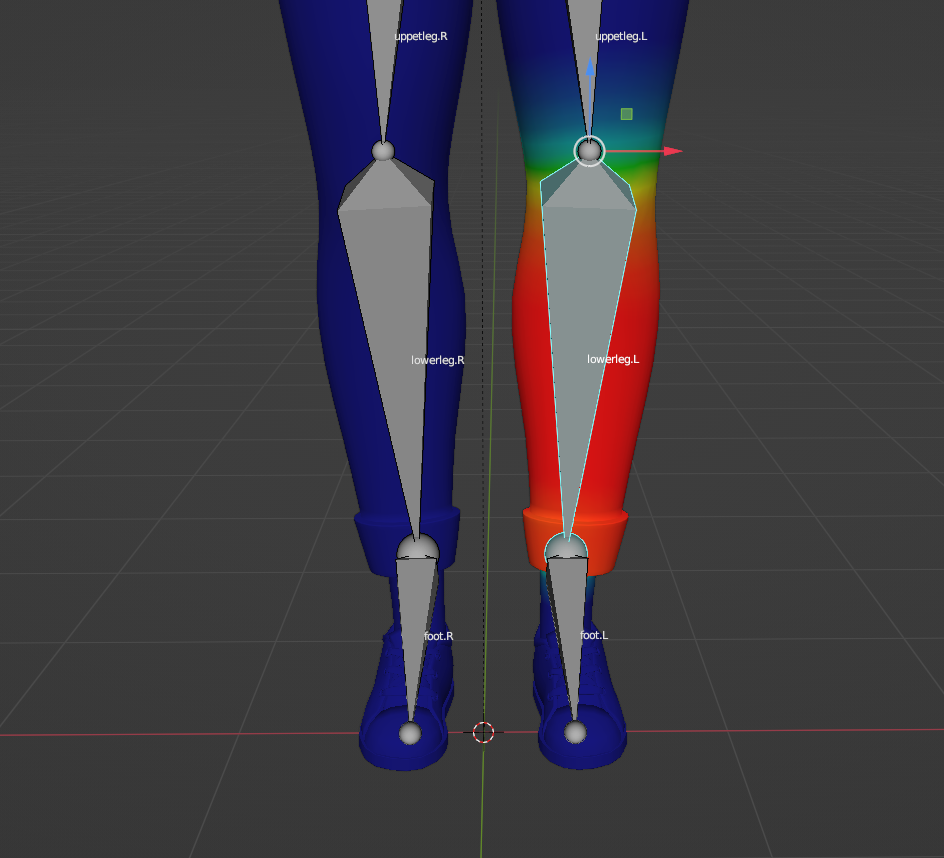
I moved onto the legs next. They were difficult compared to the arms as there was a lot of over-lap and large surface areas to cover which made me switch between the weight paint brush and face weight painting often for these bones.
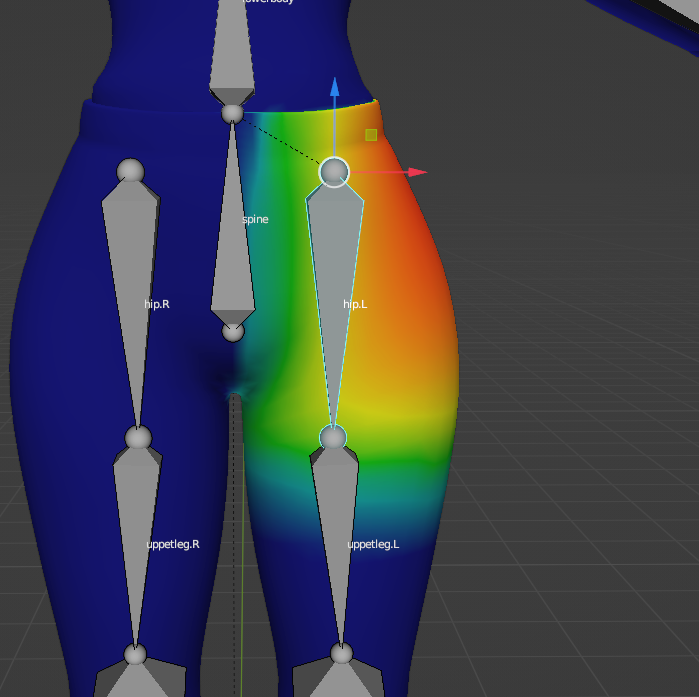
Firstly I went with the hip bones, these were the difficult bones that I had to deal with first. These caused problems as the area which I needed to cover was quite big compared to other bones and also was not mostly flat. The problem i faced was that when i put a rough weight paint down they were both connected and the trousers also had multiple layers inside of them which needed to be painted too.
This was a problem as once I began moving the leg as a test the insides of the trousers would move slower and faster than the actual trousers leg itself, and would clip through it, I quickly fixed this by going into x-ray mode and selecting the offending faces and changing the weight value on them, once I did this however I had faces from the opposite leg moving with the leg that I was working on at the time. I fixed this by once again selecting the faces and changing the weight to 0, I then moved the leg to the rest position and it was all fine again.
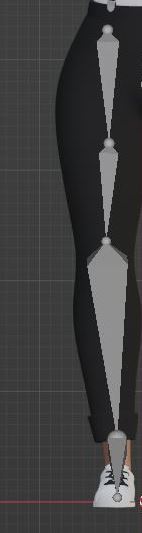
I moved down the leg to the other bones and didnt have to do too much for them. I first selected the faces i wanted, added a gradiant of weight values and assigned them to the bone, i did this for both the lower thigh bone and also the lower leg bone.
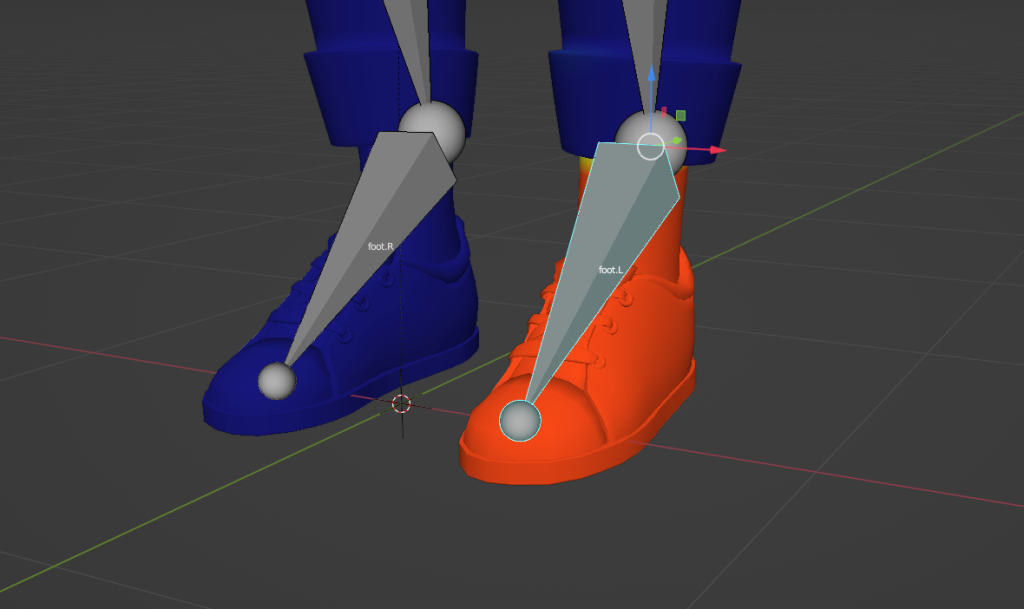
Finally for the legs I moved onto the feet. These both had some issues however they were easily fixed.
The issues were that the lace holders on the shoes didn’t want to be weight painted, however I managed to fix this after a while so that all of the shoe and feet inside the shoes would act properly and not clip out of each other.
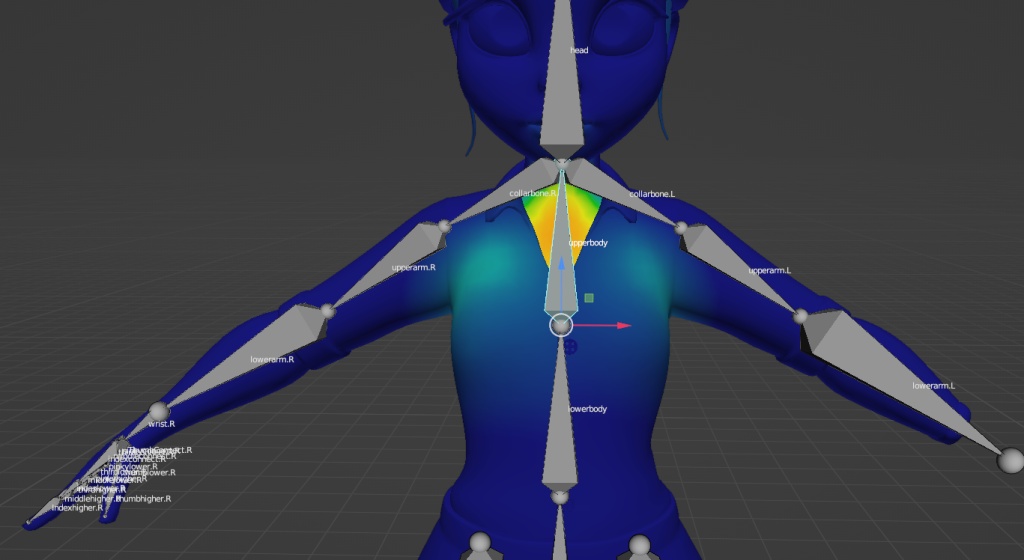
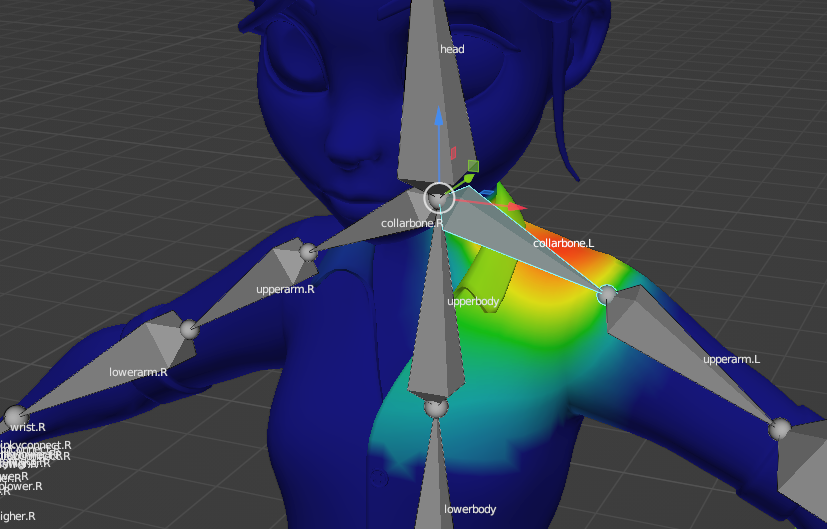
Once I finished the legs I went onto the chest which was rather easy to weight paint, all i did was enter x-ray mode select faces that needed to be selected towards the bone boundaries and assign them a medium-higher end colour, around 0.6-0.75 strength. Below are some images that corrospond to this part of the weight painting process.
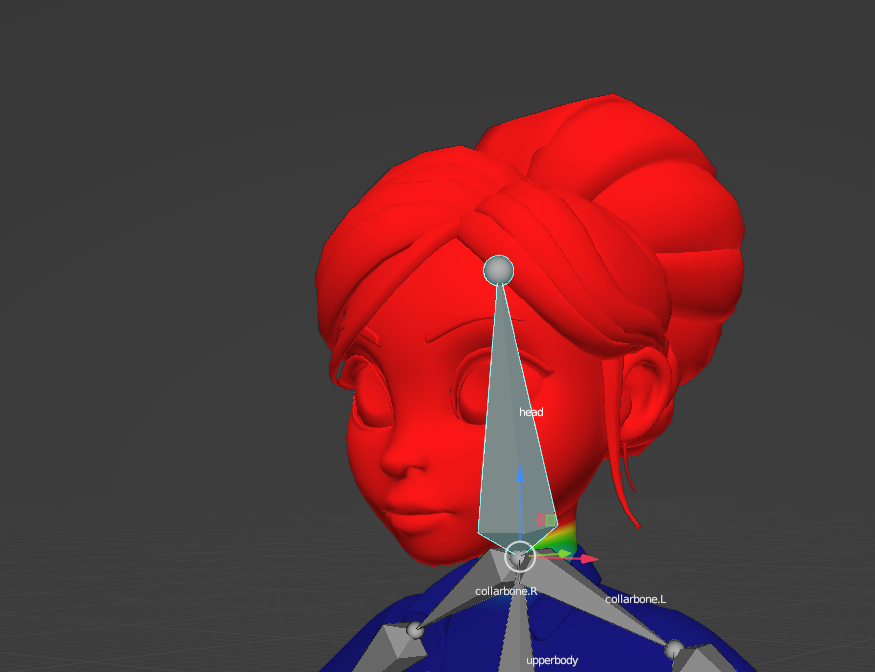
Finally I moved onto the head and for this I made the entire head the highest strength possible which was one and it would make it bright red. One issue I had while doing this was the eyes. At first i wanted to animate the eyes, however after attempting it I decided not to and joined them to the characters head and weight painted them too.
I had a slight gradient at the bottom towards the clavicle bones and once I did that i completed weight painting.
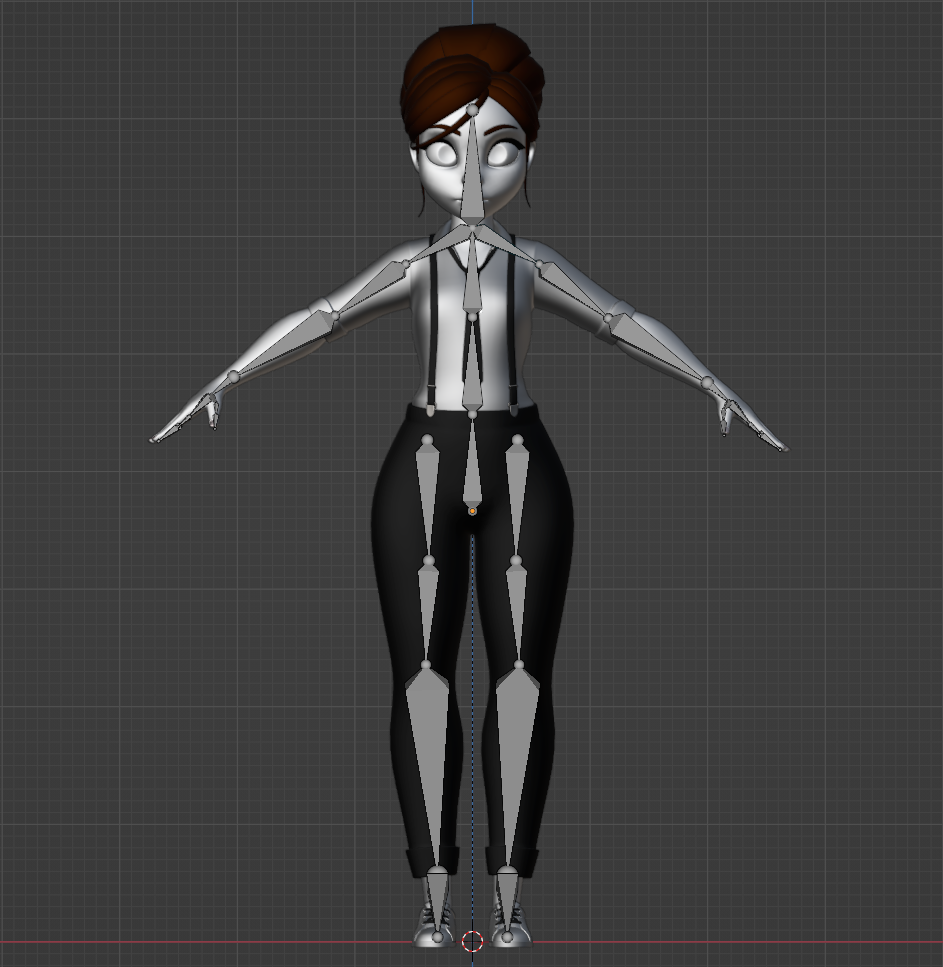
For this module I rigged the character using Blender as I have done all this module within Blender.
I started this process by adding the root spine bone to the lower pelvis area of the model.
I then extruded this bone upwards to create the bones in the lower and upper torso areas. I chose two bones as this gives the character more movement then if I only added one bone to the torso.
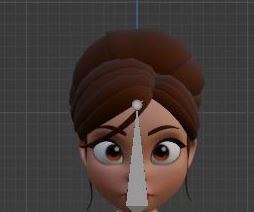
I moved onto the neck/head after this, only using one bone as i thought that would be enough instead of an individual neck and head bone. I also made it big so that I can easily control it when I need to.
Once I completed the torso and head I moved onto the arms, I did this by extruding from the lower neck joint and first made a clavicle bone joint, this lets me move the entire arm back and forward along with the clavicle, I then moved to the other arm bones, first making the upper arm bone and then the forearm bone. I also made a wrist joint to let the characters hand be easily posable.
After this I created all of the finger joints in the hand, I struggled with this at first as I didn’t really know how to make the bones work together, however after a while of trial and error I found a solution and acted on it. This solution was having 5 big bones connected within the hand itself which then go down lower in the hand to the fingers and then once that was done I could make the finger bones themselves by extruding from the big hand bones.
Once I finished with the right arm and hand I moved onto the right leg i did this by extruding slightly down from the root spine bone and then disconnected them both from one and other, this let me place the bone wherever i wanted. This also helps with positioning to avoid any errors when it came to weight painting. I then extruded downwards once to make a lower thigh bone which can help with animations which involve a walk cycle or leg movement. Then I extruded down from that bone and made a lower leg bone so that I can control the knee and finally I made the foot/ankle bone by extruding the lower leg bone and rotating it slightly to meet the same sort of angle as the foot itself.
To make them all connected I reconnected the highest leg bone to the root spine bone so that they are both binded and can also interact with each other when needed.
The final part of my rig began with me giving appropriate names to all of the bones that I have so far created. I did this by using a standard naming convention of Upperarm.R and Lowerleg.R for example. This was needed so that I could mirror these bones onto the left side. Blender does this by acknowledging the .R as right or .L as left and mirroring the joints to the other side of the selected mesh. Once I named all the joints, I mirrored it and my rig was complete.
Once I finished this I binded the rig to the mesh and moved onto weight painting.